User Guide
Table of Contents
- Table of Contents
- Introduction
- Quick start
- Typical usage workflow
- Commands and features
- FAQ
- Prefix usage table
- Command summary
- Signing off
Introduction
TAilor is a desktop app for managing contacts, optimized for use via a Command Line Interface (CLI) while still having the benefits of a Graphical User Interface (GUI). If you belong to the home faculty of the School of Computing, are a Teaching Assistant in NUS and can type fast, TAilor can get tedious contact management tasks done faster than traditional GUI apps!
Things to note before you begin
- Currently, TAilor supports only typical modules offered to students from NUS, such as MA1101R and GER1000.
- There is no support for DYOM modules at the moment as they do not conform to module naming conventions followed by most NUS faculties.
- There is only support for students whose home university is NUS currently as well, so their matriculation numbers should be in the form of “A0123456X” as according to NUS. This is essentially a 7-digit number preceded by a capital letter “A” and followed by another concluding capital letter.
- This application has mail commands that use your system’s default mail application. If none was found or set, your computer will prompt you for an application to use. To use your preferred mail app, please ensure that the specified app is set as the default in your computer settings.
If the intended usage above does not fit you, don’t worry, you still can use our application. The only downside is that features may seem a little odd to you, or you may need to do some manual adjustments. Fret not, we are currently working to produce a version of TAilor that can be used by a wider range of users, so stay tuned!
Quick start
-
Ensure you have Java 11 or above installed in your Computer. A link to download Java is provided here.
-
Download the latest
TAilor.jarfrom here. -
Move the .jar file to the folder you want to use as the home folder for your TAilor Application.
- There are two ways to start TAilor:
- Open the terminal on your PC and move to the directory where
TAilor.jaris contained in. Then, runjava -jar TAilor.jarthe application. We recommend macOS users to use this method of starting the application to avoid errors. - Double-click the .jar file to start the app.
The GUI similar to the one below should appear in a few seconds. Note how the app contains some sample data.

- Open the terminal on your PC and move to the directory where
-
Type a command into the command box and press ⏎ Enter to execute it. e.g. typing
helpand pressing ⏎ Enter will open the help window.
Some example commands you can try:-
list: Lists all contacts. -
add n/John Doe a/A0123456P e/johnd@example.com m/CS2103T g/W12: Adds a student -
delete 3: Deletes the 3rd student shown in the current student list. -
clear: Deletes all students in the student list. -
exit: Exits the app.
-
- Refer to the Commands and Features below for details of each command.
Understanding TAilor’s GUI
As seen in the above picture, there are several components of notice for TAilor:
- Command/Input box
- Feedback box
- Student List
- Task List
The following sections will guide you through them one by one:
Command/Input box and Feedback box
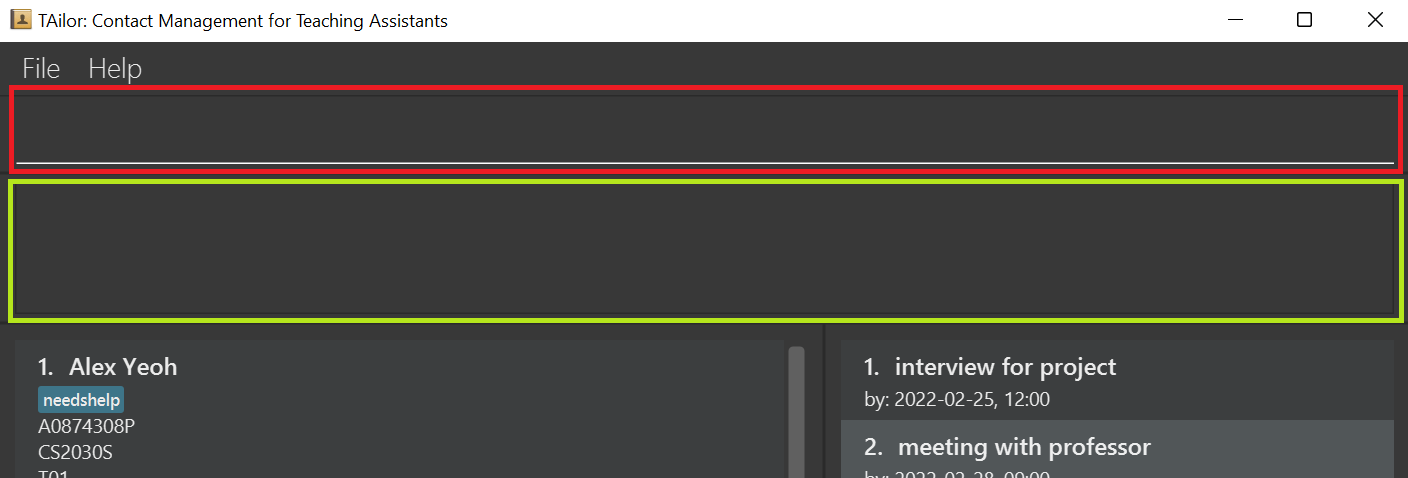
In red, is the command/input box for you to enter in your commands. Simply click on the box and type away!
In green, is the feedback box given for your command.
An invalid or wrong command entered will display some error messages for you:

A correct command will produce feedback to you about what has been done. In this case, the command delete 3 was done:

Student List
This is where you can see the students that are currently added into the application.
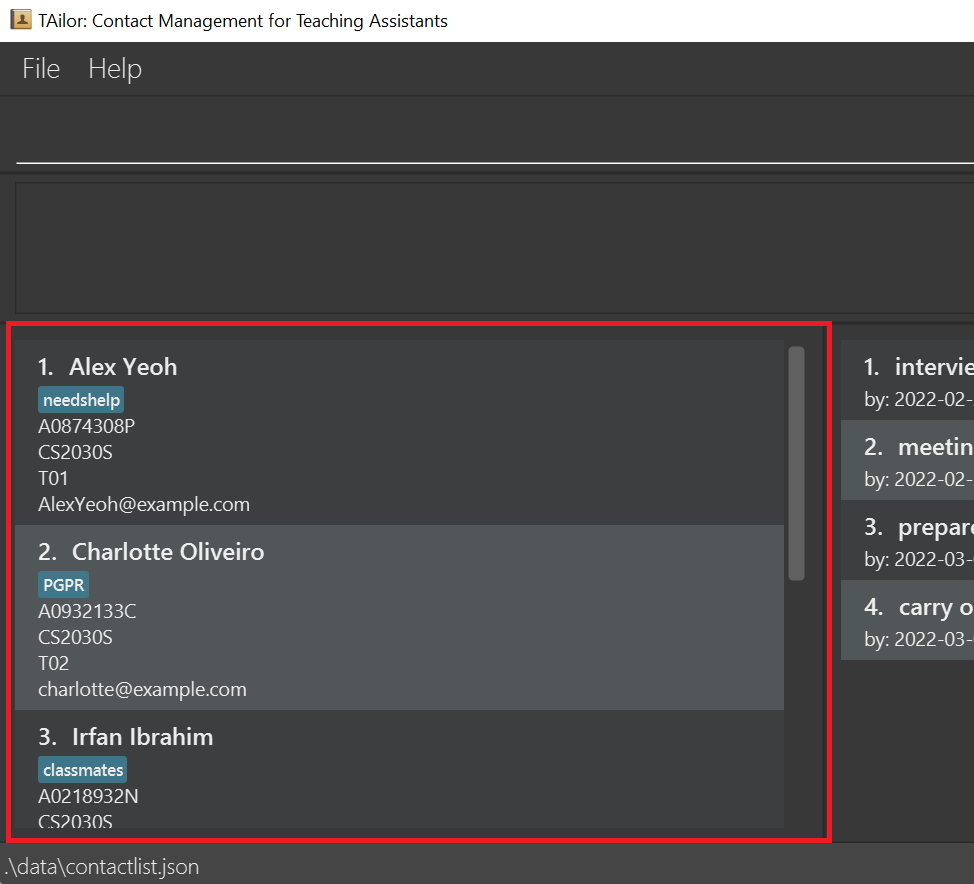
Let’s take a closer look at one of the entries in the list:

Shown here is:
| Description | From picture above |
|---|---|
| Index of the student in the student list | Index of 2 |
| Name of the student | Charlotte Oliveiro |
| Tags given to the student | One tag, PGPR
|
| Matriculation/Student number of the student | A0932133C |
| Module that the student is taking | CS2030S |
| Group that the student is under | T02 |
| Email of the student | charlotte@example.com |
Note that the group of the student can be set to anything you want, so the meaning of it is derived upon
your own usage. The example given, T02, is intended to imply that the student belongs to Tutorial Group 2.
You can choose to follow module conventions for the naming of the groups or make groupings of your own. Some additional examples are shown below:
- CS2103T groups can be
W12-1to represent the Wednesday 12PM time slot, group 1. - CS2101 groups can be
G02to represent sectional class #2 according to the conventions followed by the module in EduRec/NUSmods - If you are handling only one group, a simple description like
labortutorialcan suffice.
Task List
This is where you can see the tasks you have created.
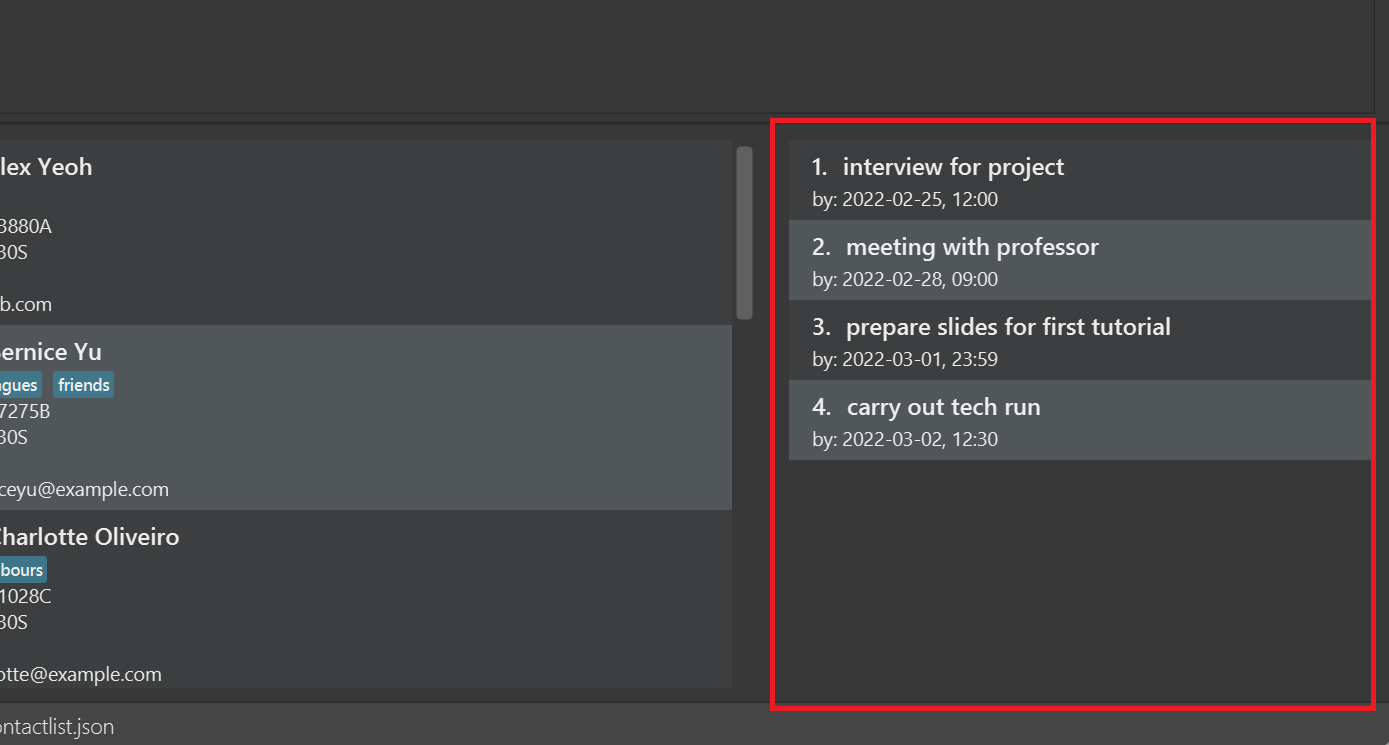
Taking a closer look at one of them:

Shown here is:
| Description | From picture above |
|---|---|
| Index of the task in the task list | Index of 1 |
| Description of the task | interview for project |
| Deadline of the task | 2022-02-25, 12:00 |
Typical usage workflow
The typical usage for a Teaching Assistant is provided as follows:
-
Launch the application from the steps given in quick start
- Add students to the student list via the add command or the import command.
- Edit students, if necessary, via the edit command.
- Perform any of the actions below whenever necessary:
- Find students via the find command.
- Mail students via the various mail commands.
- Manage tasks for yourself via the new task and delete task commands.
-
Repeat steps 2 and 3 whenever necessary.
- Exit the application via the exit command or by pressing the close button for the application.
Commands and features
![]() Notes about the command format:
Notes about the command format:
-
Words in
UPPER_CASEare the parameters to be supplied by the user.
e.g. inadd n/NAME,NAMEis a parameter which can be used asadd n/John Doe. -
Items in square brackets are optional.
e.gn/NAME [t/TAG]can be used asn/John Doe t/consultationor asn/John Doe. -
Items with
… after them can be used multiple times including zero times.
e.g.[t/TAG]…can be used ast/dropped,t/makeup t/consultationetc. -
Prefix-based arguments can be in any order.
e.g. if the command specifiesn/NAME a/STUDENT_NUMBER,a/STUDENT_NUMBER n/NAMEis also acceptable. -
Index arguments must be before all prefix-based arguments.
e.g. if the command specifiesINDEX n/NAME,n/NAME INDEXis not acceptable, asINDEXmust be before all prefix-based arguments. -
If a parameter is expected only once in the command but you specified it multiple times, only the last occurrence of the parameter will be taken.
e.g. if you specifya/A0123456H a/A1111111H, onlya/A1111111Hwill be taken. -
Extraneous parameters for commands that do not take in parameters (such as
list,exitandclear) will be ignored.
e.g. if the command specifieslist 123, it will be interpreted aslist. -
Refer to our prefix usage table for more details on the requirements for each prefix.
-
Additionally, TAilor only supports a single command being executed at any one time. There is no support for executing multiple commands.
-
Example :
edit 1 n/Bob delete 2, inputs like these result in unintended behavior as it specifies more than one command,editanddelete. -
To avoid these unintended behaviors, only enter in one command at a time before pressing ⏎ Enter.
Common commands
Viewing help : help
Shows a popup message explaining how to access the help page.

Format: help [COMMAND_WORD]
help command can be used to show either the link to the user guide or
usage instructions for specific commands.
Examples :
-
helpwill show the popup message as shown above. -
help undowill show the usage instructions for theundocommand. -
help mail-xwill show the usage instructions for themail-xcommand.
Listing all students : list
Shows a list of all students in the student list.
Format: list
Adding a student: add
Adds a student to the student list.
Format:
-
add n/NAME a/STUDENT_NUMBER e/EMAIL m/MOD g/GROUP [t/TAG]…or -
add n/NAME a/STUDENT_NUMBER e/EMAIL m/MOD [g/GROUP] [t/TAG]…if there is already a default group for the mod.
A student can also have any number of tags (including 0).
Note:
- Only non-duplicate students can be added. Ie, we cannot add duplicate students into the student list.
- Students are considered to be “duplicate” when two students have the same email address or student number.
Examples:
add n/John Doe a/A1234567L e/johnd@example.com m/CS2030S g/B12Gadd n/Betsy t/friend e/btsy@example.com m/CS2100 g/T1 a/a0123456x t/needshelp
Adding students from a CSV file: import-csv
Adds multiple students by importing a Comma Separated Values (CSV) file. This forgoes the hassle of adding students one by
one with the add command above.
Format: import-csv PATH-TO-FILE
To prepare your CSV files, follow the instructions below:
- Export your student list from LumiNUS Classes and Groups.
- When choosing the format of the file, select and export the following headers:
- Name,
- Student Number,
- Email, and
- Group
- When choosing the format of the file, select and export the following headers:
- Once exported, convert the file to a CSV file. This can be done using any modern spreadsheet software, and must be done carefully. If you are using Microsoft Office, this link may be helpful for guidance.
- Copy the file’s path and import the file into TAilor with the above command! Your file path can be an absolute or a relative path - it doesn’t matter as long as it is valid.
A sample csv file can be found here. As such, be careful not to corrupt your csv file before importing to TAilor - something that can result from writing anything or adding information that does not abide by the expected format in the file.
Editing a student : edit
Edits the details of an existing student in the student list.
Format: edit INDEX [n/NAME] [a/STUDENT_NUMBER] [e/EMAIL] [m/MOD] [g/GROUP] [t/TAG]…
- Edits the student at the specified
INDEX. This index refers to the index number shown in the displayed student list. - The index must be a positive integer (1, 2, 3, …) and should be any one of the indexes displayed. Negative examples include:
-
edit 0produces an error, as 0 is not a positive integer -
edit 100for a student list with less than 100 students, will produce an error as there is no 100th student
-
- At least one of the optional fields must be provided.
- Existing values will be updated to the input values.
- When editing tags, the existing tags of the student will be removed i.e adding of tags is not cumulative.
- You can remove all the student’s tags by typing
t/without specifying any tags after it.
Examples:
-
edit 1 a/A1122334X e/johndoe@example.comEdits the student number and email address of the 1st student to beA1122334Xandjohndoe@example.comrespectively. -
edit 2 n/Betsy Crower t/Edits the name of the 2nd student to beBetsy Crowerand clears all existing tags.
Deleting a student : delete
Deletes the specified student from the student list.
Format: delete INDEX
- Deletes the student at the specified
INDEX. This index refers to the index number shown in the displayed student list. - The index must be a positive integer (1, 2, 3, …) and should be one of the indexes displayed. Negative examples include:
-
delete 0produces an error, as 0 is not a positive integer -
delete 100for a student list with less than 100 students, will produce an error as there is no 100th student
-
Examples:
-
listfollowed bydelete 2deletes the 2nd student in the student list. -
find n/Betsyfollowed bydelete 1deletes the 1st student in the results of thefindcommand.
Setting a default group for a mod: set-default-group
Sets a default group for a particular module. This replaces the previous default group, and helps reduce redundancies when
adding a student using the add command.
Format: set-default-group m/MOD g/GROUP
-
MODmay or may not be an existing mod in TAilor’s local database -
GROUPcan be set any number of times for the same Mod. If a default group value is already set, the new group value will simply replace it as default.
Examples:
-
set-default-group m/CS2101 g/G02
-
followed by
set-default-group m/CS2101 g/G02-MonThur4-6
Locating students: find
Finds students whose details matches all of the search parameters.
Format: find PREFIX/KEYWORD [MORE_KEYWORDS]… [PREFIX/KEYWORD [MORE_KEYWORDS]…]…
[] are optional!
A simple find command can be in the form of find n/alex. Try it out!
- The prefixes used are the same as other commands:
| Prefix | What it stands for |
|---|---|
| n/ | Name |
| a/ | Student Number |
| e/ | |
| m/ | Module |
| g/ | Group |
| t/ | Tags |
Note:
- Multiple keywords can be given for each prefix.
- The order of the keywords does not matter. e.g.
Hans Bowill matchBo Hans - The search is case-insensitive. e.g
hanswill matchHans - Keywords cannot be empty. e.g.
find n/will return an error -
Only the specified prefixes will be searched
- For names and tags, only full words will be matched e.g.
n/Hanwill not matchHans -
For the rest, partial words will be matched e.g.
e/examwill matchabc@example.com - If multiple keywords are specified for a single prefix, students matching at least one keyword will be returned
e.g.
n/Hans Bowill returnHans Gruber,Bo Yang - If multiple prefixes are specified, students matching all prefixes will be returned.
Example:
Let the initial state of the list contain these 3 students: Alex, Bernice, Charlotte.
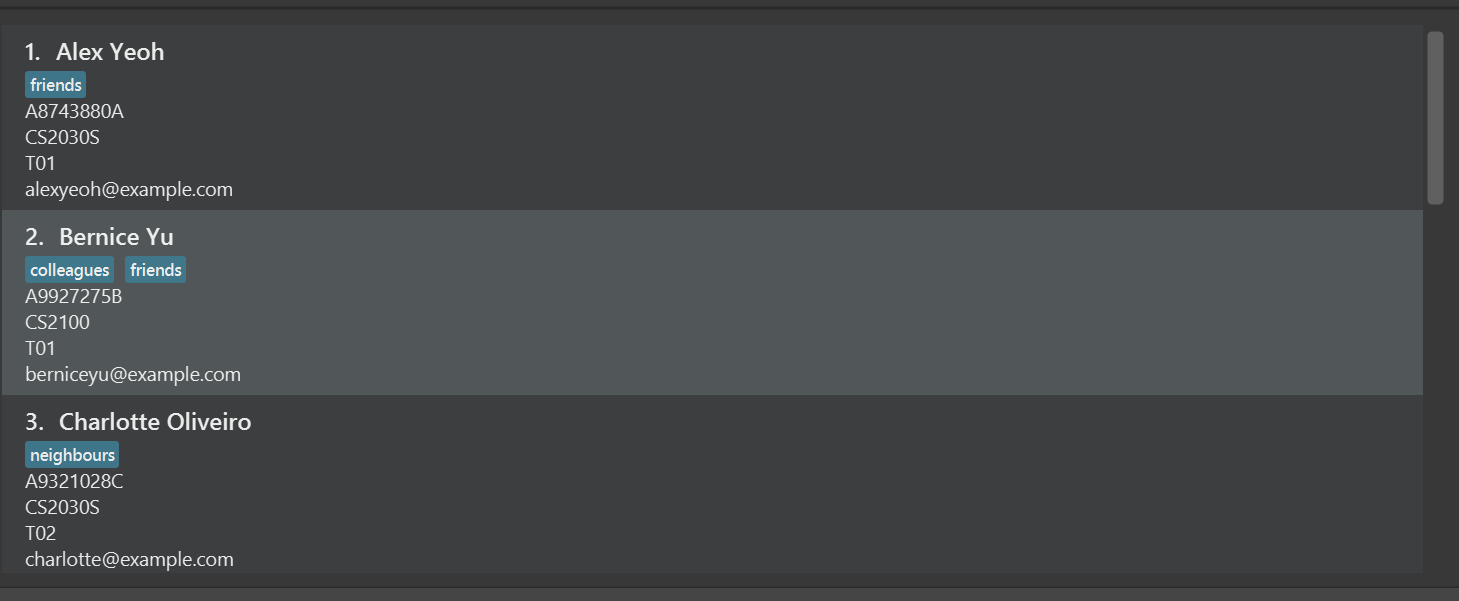
-
find n/alex bernicereturnsAlexandBernice, becauseAlexandBernicefit into the search arguments for the prefixname.
-
find n/alex charlotte m/CS g/t01returnsAlex, because:-
AlexandCharlottefit within the search arguments for the prefixnameandmodule, - However, only
Alexhas a group ofT01. - Hence, only
Alexmeets the search requirements of all search prefixes provided, and is shown.

-
Undo or Redo a previous command : undo/redo
Undoes or redoes a previously entered command that changed a student, task or module.
Format: undo or redo
- undo can only undo the effects of an add, delete, edit, clear, newtask, deltask, set-default-group and import-csv commands.
- Once you undo and enter a new add, delete, edit, clear, newtask, deltask, set-default-group and import-csv command, the state that was undone will not be accessible via redo anymore.
- Note the
undocommand will not be able to undo the effects of TAilor clearing all of its data caused by incorrect manual editing of data while the app is closed.
Example:
Let the initial state of the list contain these 4 students: Alex, Bernice, Charlotte and David.

After delete 1, we will delete Alex and the list will not have Alex anymore.
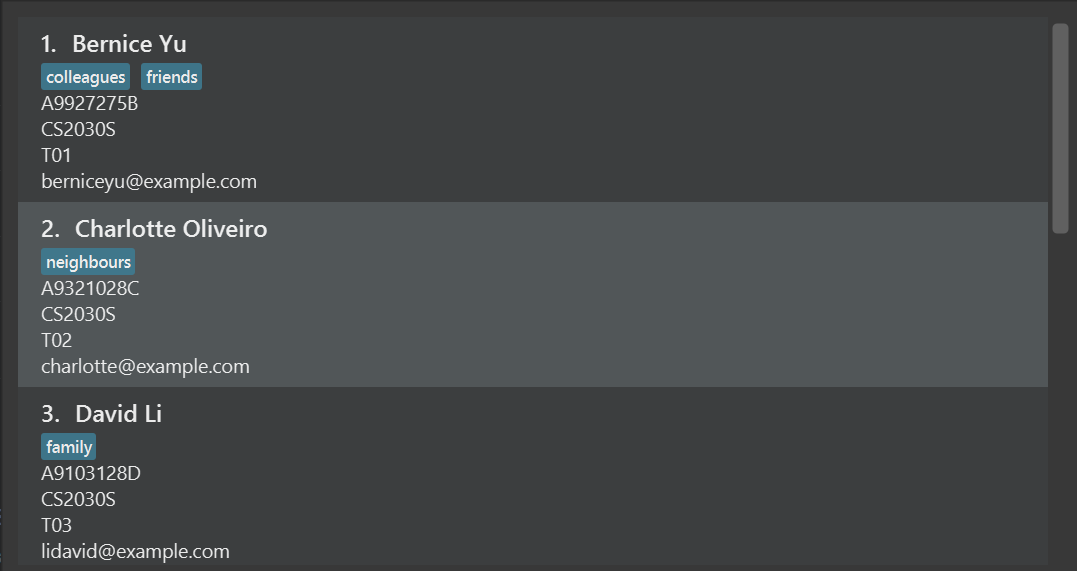
After undo, the list will return to having Alex in it

After a redo, the list will return to the state where Alex was deleted

Mail commands
Mailing students based on their index: mail-index
Mails a particular student from the student list based on the index number.
Format: mail-index INDEX
- Mails the student at the specified
INDEX. This index refers to the index number shown in the displayed student list. - The index must be a positive integer (1, 2, 3, …) and should be one of the indexes displayed. Negative examples include:
-
mail-index 0produces an error, as 0 is not a positive integer -
mail-index 100for a student list with less than 100 students, will produce an error as there is no 100th student
-
- This opens the default email application on the system with the specified mail address pre-filled at the receiver’s address.
Example:
-
mail-index 2would open the default mail on the system with the receivers’ field filled with the specified mail. Now, the email is ready to be sent to the student with the index 2 as shown on the application.
Mailing students based on arguments: mail-x
Mails multiple students from the contact list. This is a broader version of the mail functionality.
Format: mail-x [e/EMAIL] [g/GROUP] [m/MOD] [n/NAME]
- This opens the default email application on the system with all the mail addresses specified by the arguments.
- Anyone who matches at least one of the specified arguments will be included in the mailing list.
- This can be used to specify multiple prefix based arguments to send the same mail in a single go.
- At least one of the optional fields must be provided.
mail-x supports only email, group, mod and name based prefix arguments to collate email addresses.
All other attributes of a student are not supported.
Example:
-
mail-x e/johndoe@example.com n/Alexwould open the default mail on the system with the “to” box filled with the all the mail addresses covered by the arguments specified. Now, the email is ready to be sent tojohndoe@example.comand Alex.
Email everyone in the student list: mail-all
Mails everybody in the student list.
Format: mail-all
- Opens the default email application on the system with all email addresses pre-filled in the receiver’s field.
Task List commands
Adding a new task: newtask
Adds a new Task with the given description and deadline.
Format: newtask DESCRIPTION by/DATETIME
- Description must be non-empty. Ie, it cannot consist of all spaces.
-
DATETIMEhas to be in the format of :YYYY-MM-DDThh:mm. The format for this is shown below:
| Symbol | What it represents | Example |
|---|---|---|
| YYYY | 4-digit year | 1999 2020 |
| MM | 2-digit month | March - 03 November - 11 |
| DD | 2-digit day | First day - 01 Twelfth day - 12 |
| hh | 2-digit 24hour format | 3am - 03 3pm - 15 |
| mm | 2-digit minute | On the hour - 00 Last minute - 59 |
-, :, T
|
Separators | Do not change these! They need to be in the corresponding positions! |
It is also possible to create tasks that have a deadline before the current time, for task-tracking purposes!
Note:
- There is no maximum length for the description, but using a long description may hinder usability and make it hard to see your tasks!
- For your best experience, please describe your tasks with a (soft) limit of 40 characters, including spaces!
- This will be improved in the future versions.
Examples:
-
newtask Do Homework by/2022-03-21T23:59creates a task with description of “Do Homework” and is due on 21 March 2022, 11:59pm. -
newtask Check Alex's lab 4 by/2022-03-31T23:59creates a task with description “Check Alex’s lab 4” and is due on 31 March 2022, 11:59pm
Deleting an existing task: deltask
Deletes the specified task from the task list.
Format: deltask INDEX
- Deletes the task at the specified
INDEX. This index refers to the index number shown in the displayed task list. - The index must be a positive integer (ie 1, 2, 3, …) and should be one of the indexes displayed. Negative examples include:
-
deltask 0produces an error, as 0 is not a positive integer -
deltask 100for a task list with less than 100 tasks, will produce an error as there is no 100th task
-
(Positive) Examples:
-
deltask 2with a task list of at least 2 tasks, deletes the 2nd task in the task list.
Closing Commands
Exiting TAilor: exit
Simply type exit in the command box to close the application. All of your data will be stored if no unforeseen errors have occurred.
Clearing all entries: clear
Clears all entries from TAilor’s database.
clear command clears all the information present in TAilor’s database; this includes
the Student list, the Module list and also your tasks on the task manager. The clear command, however, is reversible
with the aid of undo command.
Format: clear
Shortcuts
| Button | Result |
|---|---|
| ↑ | Refills command textbox with previous entered command |
| ↓ | Refills command textbox with the command entered after the current one |
Example:
- Commands
delete 1find n/Boblistare entered in the app. - Pressing ↑ will fill the command box with
list. - Pressing ↑ again will fill the command box with
find n/Bob. - Pressing ↓ will then fill the command box with
listagain.
Saving the data
TAilor’s data is saved in the hard disk automatically after any command that changes the data. There is no need to save it manually.
Editing the data file
TAilor’s data is saved as three JSON files.
- The first being Student List’s data as
[JAR_file_location]/data/contactlist.json, - The second being Task List’s data saved as
[JAR_file_location]/data/tasklist.jsonand - The Module List’s data being saved as
[JAR_file_location]/data/modulelist.json
Advanced users are welcome to update the data directly by editing those data files.
To save the current state into the data files, perform any command that changes the contact list or task list (ie add new task, add new contact).
WARNING: This overrides any changes made to the data after TAilor has started, if you modified them while TAilor is running.
FAQ
Q: How do I transfer my data to another Computer?
A: Download and run TAilor on your other computer and overwrite all 3 data files created with the data files that contains
the data of your previous TAilor usage, as found in the locations mentioned in the above section on editing data files.
Prefix usage table
| Prefix | What it means | Usage requirements | Example Usages |
|---|---|---|---|
| n/ | Name | Can only contain alphanumeric characters or spaces, and cannot be blank. | n/Alex Yeoh n/Bob Wee |
| a/ | Student Number | Must start with an a, followed by 7 digits and ending with one letter. |
a/A0123456N a/a0102034x |
| e/ | Has 2 parts separated by a mandatory @. Before the @: Can contain alphanumeric characters or these special characters: +-_., but cannot start or end with the special characters.After the @: At least 1 alphanumeric character |
e/johndoe@test.org e/Alex@example.com |
|
| m/ | Module Code | Must start with 2 or 3 capital letters, followed by 4 digits, and an optional last letter that is also capitalised. | m/CS2030S m/GER1000 |
| g/ | Group Number | No restrictions on characters, but cannot be blank. | g/group1 g/tuesday 12pm |
| t/ | Tags | Must be alphanumeric, with no spaces. To add multiple tags, specify multiple t/ prefixes. |
t/friend t/foe |
| by/ | Deadline | Must be in the format of YYYY-MM-DDThh:mm, more details are under the newtask command. |
by/2022-03-21T15:21 by/2011-12-01T03:17 |
Command summary
| Action | Format, Examples | |
|---|---|---|
| Help |
help, help list, help mail-x
|
|
| List | list |
|
| Add |
add n/NAME a/STUDENT_NUMBER e/EMAIL m/MODULE g/GROUP [t/TAG]… or add n/NAME a/STUDENT_NUMBER e/EMAIL m/MODULE [g/GROUP] [t/TAG]… e.g., add n/James Ho a/A1234567Y e/jamesho@example.com m/CS2100 g/W12 t/friend t/colleague
|
|
| Import csv |
import-csv PATH_TO_CSV_FILEe.g. import-csv C:\Users\Alice\Downloads\file.csv
|
|
| Edit |
edit INDEX [n/NAME] [a/STUDENT_NUMBER] [e/EMAIL] [m/MODULE] [g/GROUP] [t/TAG]…e.g., edit 2 n/James Lee e/jameslee@example.com
|
|
| Delete |
delete INDEXe.g., delete 3
|
|
| Set Default Group |
set-default-group m/MOD g/GROUP e.g., set-default-group m/CS2103T g/W12-1
|
|
| Find |
find PREFIX/KEYWORD [MORE_KEYWORDS]… [PREFIX/KEYWORD [MORE_KEYWORDS]…]…e.g., find n/James Jake a/A0217
|
|
| Mail Index |
mail-indexe.g., mail 2
|
|
| Mail X |
mail-xe.g., mail e/johndoe@example.com n/Alex
|
|
| Mail All | mail-all |
|
| New Task |
newtask DESCRIPTION by/DEADLINE e.g., newtask Do homework by/2022-03-21T12:34
|
|
| Delete Task |
deltask INDEX e.g., deltask 3
|
|
| Undo/Redo |
undo/redo
|
|
| Clear | clear |
|
| Exit | exit |
Signing off
We hope you have a great time using TAilor and that it helps make your everyday lives a little simpler. Thank you for everything that you do for the teaching community as Teaching Assistants!
We’ve thoroughly enjoyed making this application for all of you!
Warmest Regards,
Team TAilor